Anything "Duochrome" or "Chameleon" can also be found using the tag "Color Shifting"

Updates & Notices

Warning: This blog and some info within is out of date. The date of any updates are usually noted at the top of each page/entry. As of 1/08/20, all pages have had dead links removed/repaired as well as 2010 entries and 2011 Jan-July.

Friday, May 27, 2011

Swatches: Updated Travel tos & Mixes

Links checked 12/12/13

All pictures can be enlarged.

TKB Trading's Travel to series (also sold as the Planetary Sampler) are easily among my favorite pigments, the reason being the endless variety of color they offer if you're willing to play around with them.

I've used these pigments in both clear polish, shown on the left and in black, shown on the right; you can see, there really isn't much difference. In my other post(s), they were shown on a white index card whereas this is a piece of black cardboard. The black background shows the color much better I think.

The order is Jupiter, Venus, Pluto, Neptune, Earth, Mars and Mercury.

These are the same bottles I posted in the first entry Swatches: TKB's Travel to…Pigments only downsized. I used these for the swatches above on the right and those below. The formula was basically the same for all seven (based on the full size bottle): ¼ Luster base, 30 liquid drops L.A.Colors Black Velvet, ½ clear polish, 6+ smidgen (the mini spoon) pigment.

Both of these were taken under the same lighting as the swatches I'll show you later.

Jupiter, Venus, Pluto, Neptune

Earth, Mars, Mercury

Now all those swatches were for comparison purposes. I have taken some of the more notable combinations from the Duochrome Combinations list and mixed them up as color recipes and polish. The (dry) color recipes are simply equal parts of each pigment required.

Set A-I
The formula on each of these was the same. 7½ drops L.A.Colors Black Velvet, 1½ ml Luster base, 3ml clear polish, 4 drops (mini spoon) of the mix. The recipe was broken down for TKB's Duchess Elizabeth mini bottle that I have measured as holding 6ml.

295- Mix A: Venus-Merc 3:1
296- Mix B: Pluto-Jupiter 3:1
297- Mix C: Earth-Jupiter 3:1
298- Mix D: Venus-Mars 3:1
299- Mix E: Jupiter-Mercury 1:1
300- Mix F: Jupiter-Mercury 3:1
301- Mix G: Pluto-Mercury 3:1
302- Mix H: Earth-Neptune 3:1
303- Mix I: Neptune-Venus 3:1

From top to bottom we have Mixes B, H, A

From top to bottom we have Mixes E, D, C

From top to bottom we have Mixes I, G, F

Set J-Q
The formula on each of these was the same. 3-4 drops L.A.Colors Black Velvet, 22 drops Luster base, 1½ml or 45 drops clear polish, 2-3 drops (mini spoon) mix. Recipe downsized for a 3ml Bon Bons mini bottle.

321- Mix J: Pluto-Mars 3:1
322- Mix K: Pluto-Neptune 3:1
323- Mix L: Jupiter-Pluto 3:1
324- Mix M: Earth-Pluto 3:1
325- Mix N: Neptune-Earth 3:1
326- Mix O: Venus-Pluto 3:1
327- Mix P: Venus-Neptune 3:1
328- Mix Q: Venus-Jupiter 3:1

From top to bottom we have Mixes L, K, G

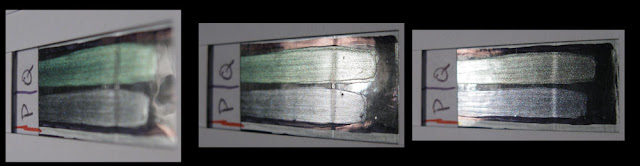
From top to bottom Mixes O, N, P

From top to bottom Mixes Q, P

Now aside from the original 7 Travel to's, none of these formulas were configured for actual use on my nails. I wanted to test those particular combinations to see them in transition but they are all very sheer as is, requiring at least 4 coats for these swatches.

Happy Duochroming! -MK

Thursday, May 19, 2011

Franken: #266 Atlantis

Links checked 12/12/13

This franken polish, #266 Atlantis is another layering polish but also a duochrome, shown in this post (on the nails) over #224 Blackstar Turquoise. Any resemblance to China Glaze's polish of the same name is coincidental as I made this before I knew of it.

The supplies used were: 1 bottle, 2 BBs, Sinful Colors Nail Junkie, L.A.Colors (Color Craze line) Radiation, Sally Beauty's glitter I labeled Sally B & Vial A from my Hobby Lobby glitters (view both of these here), Then there was the later addition of TKB Trading's Black Basic Black base to darken it slightly and TKB's Travel to Earth pigment making it a D/C.

The bottle up close.

A closer shot of the glitters used, taken outdoors in sunlight.

Both glitters shown in small swatch in clear polish.

Travel to Earth photo also taken outdoors in sunlight. Though you can't see the color transition you can see its bright green flash.

The exact formulation was 1/3 SC Nail Junkie, 1/3 LAC Radiation, Sally B & Vial A glitters, 3 drops Earth pigment and 3 drops TKB Trading's Basic Black base to darken it slightly.

When any of the glitters I own are used, the appearance of the polish is bumpy; the texture changes with the size and amount of glitter used.

Swatches of Atlantis by itself on paper, the left on black, the right on white. Taken indoors in sunlight.

And shown below on nails over #224 Blackstar Turquoise. I have to rely on these to display the duochrome effect (as the angle changes) so these are in the order taken.

This set photographed indoors, daylight but no sun.

Outdoors with sunlight but not direct.

One last photo, outdoors in direct sunlight.

 -MK

Saturday, May 14, 2011

An Early Warning about Posting Delays

I realize I haven't been regular the last couple months as well but starting June 1st both my sons are out of school for summer vacation from then until sometime in mid-August. Most of the days during the week I will be at my father's with my boys while the spouse of mine goes to work. I will have access to my normal frankening supplies but not regular access to a computer for posting. Under those circumstances expect delays in posting and my replies since I arrive home late these times which doesn't leave me time to play catch up but rest assured I haven't forgotten any of you.
-MK

Tuesday, May 10, 2011

Franken: #224 Blackstar Turquoise

Links checked 12/12/13

I wanted to show you another franken polish but didn't want to remove my current polish so I'm using my model for this post. This is both a franken and a color recipe comprised mainly of Coastal Scents pigments.

In the Blackstar line of pigments there is a blue, green, red and gold but no purple or aqua color which I thought was a shame so I decided to try my hand at making them. The final result turned out like I wanted but is somewhat diminished in polish.

The supplies used were: CS Summit Turquoise, TKB Black mica, CS Ocean Blue and CS Emerald glitter (using TKB Trading's mini spoon set) for the color recipe. For the franken I also used the requisite BBs, clear polish, Sally Hansen Black Out (XtremeWear) and CS Crystal Ice mica.


The recipe is ®SS Blackstar Turquoise
3 tad (TKB) Black mica
2 tad (CS) Summit Turquoise (like Hilite pigments)
2 smidgen (CS) Ocean Blue Glitter
1 smidgen (CS) Emerald Glitter

Blackstar Turquoise shown below as dry swatches in natural daylight. The swatches on the left were taken outdoors in direct sunlight.
 

The polish is: an unspecified amount of ®SS, ½ clear, ¼ SH Black Out, and a small amount of Crystal Ice mica for sparkle. Is there such a thing as "too much" pigment? Sure, but I add it until its opaque enough to suit me and settling be damned. I can't paint well on fake hands either.

Outdoors, no sun.
 

                                            Outdoors, direct sunlight.  
 

                                        Indoors, daylight but no sun.

-MK

Monday, May 9, 2011

(One of) Life's Little Lessons

When it comes to my computer, I'm security conscious. My passwords are all different, long and convoluted. I never save them, I delete and shred temp files every time I exit Internet Explorer. I have three different programs for security and the typical firewall. I scan my pc multiple times a day as needed and defragment it often. You see, not only am I married to an experienced computer technician but I've been hacked into (as in, watching windows open on your pc and passwords being entered in from the other side of cyberspace) and had all kinds of spyware and viruses so I've learned to be proactive about  security and maintenance. I assumed I was safe and locked down tight. Saturday I learned different.

My son is 11 right now, a pretty smart kid but into Webkins, Pokemon and Bakugan much to my annoyance so he chooses, when allowed, to go to those websites and play the available games. This time, by doing who knows what because I wasn't home, he managed to get not one trojan on my pc but three AND a trojan downloader which as implied, is a trojan that downloads other trojans. That was Saturday afternoon. Now it's Monday evening and I just did get my pc clean- and thats with the pc tech/hubby's help.

Here's my point: if you have children that use your pc, even if you assume or feel certain they know what they are doing on the internet- where not to go, what not to do, what not to open, load or click on, assume that they don't know and act acordingly. -MK

Tuesday, May 3, 2011

Franken: #330 Red Sparkle

Links checked 12/12/13

Normally I'm not into layering franken polishes because it takes too many coats of polish and too much time but I do occasionally make one that’s so sheer, it can be nothing else. The manicure I'm going to show you was more or less an accident albeit a pleasant one. I'd intended to display one of those oddball duochromes I created, a maroonish red with a green flash/highlight but under certain lighting it took on an unattractive brown hue so it needed spicing up. The polish I chose to accent it is a red glitter, jelly based with some silver holo glitter. Both the holo and the red glitter came from TKB Trading as samples so while the holo is like their Holla Glow glitter, I can't say if the red is the same as the red microfine glitter they sell.

The exact formulation on this one is sort of a mystery because I either didn't write the list of ingredients down or I've since lost them but the supplies I used were the afore mentioned glitters, 2 BBs, clear polish, a touch of TKB's Basic Red base, some Glamour Glamour base for glitter and as a backup suspension, some L.A. Girl Essentials Nail Lacquer in color #239 Red Sparkle, also a red jelly based glitter polish. I find the L.A Girl polishes a cheaper option for frankening since they are generally less than $2.00 each and widely available online.

The end result is what you see below sans topcoat. It's three coats of the oddball duochrome underneath, two of my #330 Red Sparkle on top. Unfortunately we have more rainy weather so the sun wouldn't oblige me but I tried capturing the sparkle under several different lighting conditions- when the sun does show itself, I'll update the pictures. I'd like to think this polish has the same flair of China Glaze's Ruby Pumps but with various sized red glitters, including the red disc glitter (which would not place evenly) and the addition of a slight holo.

Outdoors in daylight, no sun. What appears as sliver glitter is actually the holo glitter.

Indoors, daylight but no sun.

Indoors under "Daylight" light/lamp but with "Indoors" setting on camera.

Indoors under "Daylight" light/lamp but with "Auto" setting on camera.

Indoors again but under regular light.

These photos were taken a couple days later than those above, outdoors in direct sunlight. I don't feel they are a fair representation of the polish because I can't paint for crap but the lighting was right. The second is blurry but shows at least a little of the holo.


All in all, easy franken to make and one of my favorites. -MK